Understand what “advanced” really means
If you search for an advanced chest workout, you usually find long lists of exercises and marathon sessions. More is not always better. For you, an advanced chest workout should mean:
- You target all areas of the pecs.
- You press from different angles.
- You use intensity techniques sparingly and with purpose.
- You recover well enough to keep getting stronger.
Your chest is mainly the pectoralis major, which has fibers that run in different directions. The upper chest (clavicular head) runs diagonally upward from the collarbone, the mid chest runs more horizontally, and the lower chest runs diagonally downward from the bottom of the sternum. Because the fibers run in different directions, training angle matters if you want complete chest development.
Flat and decline presses focus more on the mid and lower chest. Incline pressing involves more shoulder flexion, so it hits the upper chest more effectively, as described in advanced programming approaches from 2024 by Muscle & Strength.
An advanced chest workout does not need to be complicated, but it does need to be intentional.
Target each region of your chest
A strong, well developed chest comes from consistently training all three main regions:
- Upper chest
- Mid chest
- Lower chest
Here is how you can think about each one.
Upper chest (clavicular head)
Your upper chest gives that “shelf” look where your pecs flow into your shoulders and traps. If you neglect it, your torso can appear lower and less tied into your upper body.
To train it, you need more shoulder flexion. That means:
- Incline presses
- Decline push ups
- High to low cable work that finishes above shoulder height
Australian coach Eugene Teo suggests that the ideal incline angle usually lands between 30 and 60 degrees, depending on your rib cage and shoulder structure. The goal is to line the working fibers up so they are roughly perpendicular to the direction of resistance. In practice, this often means a moderate incline rather than setting the bench as high as it will go.
Mid chest (sternal head)
This is the thick, central part of your chest. Most horizontal presses load this region well:
- Flat barbell or dumbbell bench press
- Machine or cable chest press set to a flat path
- Standard push ups
Because this area gets a lot of work from regular bench pressing, you do not need to overload it with endless extra sets. You do need to press heavy enough and add weight over time.
Lower chest (costal or abdominal fibers)
The lower or costal head attaches closer to the upper abdominal area. It often gets less direct attention in generic programs, but it contributes a lot to the full, rounded look of the chest.
To reach it, you want arm paths that travel slightly downward relative to your torso, such as:
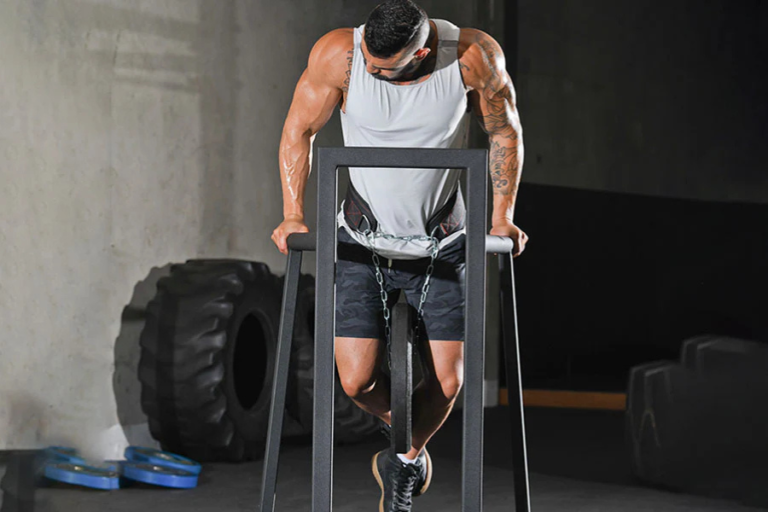
- Weighted dips
- Decline presses
- Certain cable paths that finish near the lower ribs
Teo notes that dips and decline presses are useful for lining the arm path up with these lower fibers, especially if you lean slightly forward rather than staying perfectly upright.
Use smart arm paths and grips
The way you move your arms and hold the weight can change which muscles do most of the work.
Elbow position
Teo recommends a 45 to 60 degree tuck in the elbows when you press, rather than flaring them out directly to the side. This more tucked position helps you:
- Align your upper arm with the pec fibers.
- Reduce overuse of the front delts and triceps.
- Lower stress on the shoulders.
You can think of it as halfway between pin-tight to your sides and completely flared.
Hand and grip position
Grip width and orientation both matter:
- A wider grip on barbell bench tends to emphasize the lower pec region but can add shoulder stress.
- A closer grip slightly increases range of motion, but it shifts more work to the triceps.
- A neutral grip on dumbbells, with palms facing each other, can feel more shoulder friendly because it naturally keeps the elbows closer to your ribs.
You do not need a perfect textbook setup, just a position where your pecs feel like they are doing the work and your joints feel comfortable.
Balance free weights, cables, and machines
You may see strong opinions that only free weights build a big chest. It is true that historically, many of the best chests in bodybuilding were built mostly with free weights. That does not mean machines are useless, but it does mean you probably do not want to depend only on them.
Here is a simple way to divide the work in your advanced chest workout:
- Use barbells and dumbbells for your main heavy presses.
- Use cables for continuous tension and to work across the midline of your chest.
- Use machines for extra volume or fatigue friendly sets at the end.
Free weights, especially dumbbells, let you move through a natural path, get a larger range of motion, and adjust your grip so your shoulders feel better. Cable flys add tension across the whole motion, especially in that top “squeeze” position that is often undertrained with free weights alone.
Variable resistance options, such as bands or chains on presses, can increase tension near the top. Teo highlights that loading the lockout position with these tools is a useful way to challenge chest fibers that might otherwise coast when your joints are in a mechanically strong position.
Avoid common advanced chest mistakes
As you push into advanced territory, a few traps can actually slow your progress.
Relying only on the barbell bench press
The flat barbell bench is a useful tool, but if you treat it as your only chest exercise, you may end up with:
- An overdeveloped lower chest compared with your upper chest.
- More shoulder, wrist, or elbow strain.
- Higher risk of pec tears if you chase heavy singles without balance or variation.
Instead, treat the barbell as one highlight of your week. Surround it with dumbbell and cable work from different angles.
Forgetting the upper chest
Many lifters set up programs that are heavy on flat and decline work. Over time, the upper chest lags and your torso can look “bottom heavy.” Prioritizing incline movements early in your session is one of the most direct ways to fix this and improve the way your chest ties into your delts and traps.
Letting other muscles do the work
If you use momentum or bounce the bar, you end up “working the weight, not the muscles.” With free weight presses and flys, resistance changes through the range, so it is easy for the triceps or shoulders to take over.
To keep the emphasis on your pecs:
- Lower with control, especially in the eccentric.
- Pause briefly near your chest on heavy presses.
- Think about driving your upper arm in, not just your hand up.
Training so hard you cannot recover
High volume and intensity can look impressive on paper, but it can stall your progress if you cannot recover. In one advanced routine, someone with a 225 pound max bench press used 6 or more working sets of bench plus 7 sets of heavy dumbbell presses, dips, and cable crossovers, all close to failure. Their recovery stretched to 3 or 4 days for chest, and there was no progress in personal records.
When the intensity dropped, recovery time shrank and training felt better. That is a reminder that more sets and more failure is not always the path to more strength.
You want enough volume to grow, but not so much that you spend most of your week too sore or fatigued to add weight over time.
Structure your weekly chest training
You can have an effective advanced chest workout with 1 or 2 focused sessions per week.
Frequency and volume
A practical target for most lifters is:
- Chest training 1 to 2 times per week.
- Enough sets to challenge the muscles, but still recover.
Advanced programming suggestions often land around 2 to 4 chest sessions per week as a broad range, but you do not need to start at the top end. Pay attention to your recovery and adjust.
You can organize your weekly work like this:
- Session A: heavier focus, more moderate to heavy presses.
- Session B: higher rep, more cables, flys, and pump style work.
Rotating exercises between sessions, for example alternating between barbell and dumbbell presses, can help reduce joint stress over time.
Rep ranges and loading
Chest hypertrophy responds well across a wide range of reps. A simple way to think about it:
- Heavy: 5 to 10 reps
- Moderate: 10 to 20 reps
- Light: 20 to 30 reps
You might put about half of your weekly sets in the 10 to 20 range, then sprinkle in lower rep strength work and some higher rep finisher sets.
The key is progressive overload. Over many weeks, you either:
- Use the same reps and increase weight.
- Use the same weight and add reps.
- Add an extra set when you can still recover well.
Follow this sample advanced chest workout
Use this advanced chest workout as a template. You can repeat it twice per week or split it into two slightly different sessions.
Warm up
Take 5 to 10 minutes to:
- Do light upper body mobility, for example arm circles and band pull aparts.
- Perform 2 to 3 easy sets of cable flys or push ups for 12 to 20 reps to drive blood into the chest.
Cable flys make a good warm up because they provide continuous tension and help your mind connect with your chest before you move to heavier lifts.
Main workout
- Incline dumbbell press
- 3 to 4 sets of 6 to 10 reps
- Set the bench around 30 to 45 degrees to hit the upper chest.
- Use a neutral or semi neutral grip and keep elbows tucked around 45 to 60 degrees.
- Rest 2 to 3 minutes between sets.
- Flat barbell bench press or dumbbell bench press
- 3 to 4 sets of 6 to 10 reps
- Use a grip that feels strong without stressing your shoulders.
- Pause briefly just above the chest before pressing.
- Rest 2 to 3 minutes.
- Weighted dips or decline press
- 3 sets of 8 to 12 reps
- If you choose dips, lean slightly forward to keep tension on the chest rather than the triceps.
- If dips bother your shoulders, switch to a decline press variation.
- Rest 1.5 to 2.5 minutes.
- Cable crossover (two angles)
Alternate angles from workout to workout:
- One day: high to low path to emphasize lower chest.
- Another day: low to high path to emphasize upper chest.
Perform: - 3 sets of 12 to 20 reps
- Focus on crossing slightly across the midline of your chest at the top to fully shorten the pecs.
- Rest 60 to 90 seconds.
- Dumbbell fly, partial range
- 2 to 3 sets of 15 to 20 reps
- Lower only as far as you can keep tension comfortably on the chest, not so deep that you strain your shoulders.
- Think about hugging a wide tree, elbows softly bent.
- Rest 60 to 90 seconds.
This mix covers:
- Heavy incline and flat pressing for upper and mid chest.
- Dips or decline pressing for lower chest.
- Cable work that moves across the midline.
- Isolation flys to finish with high tension and a deep pump.
You can adjust the order slightly, but keep the heaviest compound lifts early when you are fresh.
Add advanced techniques carefully
Advanced methods can increase stimulus, but they also increase fatigue. Use them as accents, not the base of your program.
Post Activation Potentiation (PAP)
PAP involves performing a very heavy set for 1 to 2 reps, then dropping back to your normal working weight. This can temporarily enhance your strength and performance.
You could apply PAP like this:
- Warm up as usual on the bench press.
- Perform 1 heavy set of 1 to 2 reps at a weight above your normal working load, but still safe.
- Rest properly.
- Perform your usual working sets in the 6 to 8 rep range.
Advanced programs in 2024 highlight PAP as a way to boost strength gains, but it is best used sparingly, for example once per week or in a short training block, and only when your technique is solid.
Rest pause sets
Rest pause involves working close to failure, resting briefly, then squeezing more reps out of the same set. For example:
- Perform 10 to 12 reps close to failure.
- Rest 30 seconds or take about 10 deep breaths.
- Perform as many more reps as you can.
- Optionally repeat that mini rest and rep sequence once more.
Rest pause increases training volume and metabolic stress, which supports muscle gain. Guidance from 2024 suggests using this method with caution because fatigue is high, especially if you try it with big barbell lifts.
A safer approach is to save rest pause for:
- Cable presses or flys.
- Machine chest presses.
- Bodyweight push ups.
Avoid it with heavy bench presses to keep your risk lower.
Other intensity tools
You can also try:
- Controlled eccentrics and pauses to strengthen weaker positions.
- Down sets where you reduce weight after a heavy top set and perform a higher rep back off set.
- Pre exhaust supersets, for example flys before presses, to deepen the chest pump and mind muscle connection.
These all work, but they should sit on top of the basics, not replace them.
Train hard, then recover properly
An advanced chest workout will not lead to impressive strength if you do not support it with proper recovery and nutrition.
Recovery between sessions
You should feel some fatigue or soreness after a solid chest session, but it should not linger all week. If you notice:
- Chest soreness or fatigue still strong after 3 or 4 days.
- Bench press numbers stalling or dropping.
- Joints feeling worse as weeks go by.
You may be doing too much volume or too many high intensity techniques. Slightly reduce:
- The total number of sets.
- The number of exercises to failure.
- The frequency of your chest workouts.
Most people progress best when they can train hard, recover in 2 to 3 days, and then hit the chest again with enough energy to push weights up over time.
Support with nutrition
Your muscles grow outside of the gym, not during the workout. For strength and size, advanced programs often recommend about 1 gram of protein per pound of bodyweight each day. This gives your body the raw materials it needs for repair and growth.
Pair that with:
- Enough total calories to support your training.
- Consistent sleep.
- Hydration throughout the day.
You do not need a perfect meal plan, but you do need consistency.
Put it all together
If you want your advanced chest workout to actually build impressive strength, keep your focus on:
- Hitting upper, mid, and lower chest with the right angles.
- Using smart arm paths and grips that let your pecs do the work.
- Building around free weight presses, with cables and machines as support.
- Avoiding extremes in volume and failure that slow down recovery.
- Using PAP, rest pause, and other methods carefully, not constantly.
- Progressively adding weight, reps, or sets over time.
Start by making one improvement in your next chest workout. For example, move incline dumbbell press to the very beginning or add a cable crossover that crosses the midline to finish your session. Then build from there, paying attention to how your chest responds week by week.